Guide On common scan to smb issue & tips on how to resolved
The issue of unable scan to SMB can be frustrating, often scan to SMB issues arise from updates to Windows. Below is the several root cause that unable scan to SMB on the PC.
- Scan user account password has been expired
- Password-Protected Sharing. (Not applicable to those PC that under Domain)
- Sharing and permissions of the folder
- Changing of the computer name
1) Scan user account password has been expired
Mostly scan to SMB setup will creating a scan user account with permission to access the shared folder. In most of the case, the user account for scan to folder will be under kmscan and most possibility the password is being reset after window update, kindly follow below step on how to reset back the password again.
Username: kmscan
Password: kmscan (without domain) / Minolta.123 (with domain)
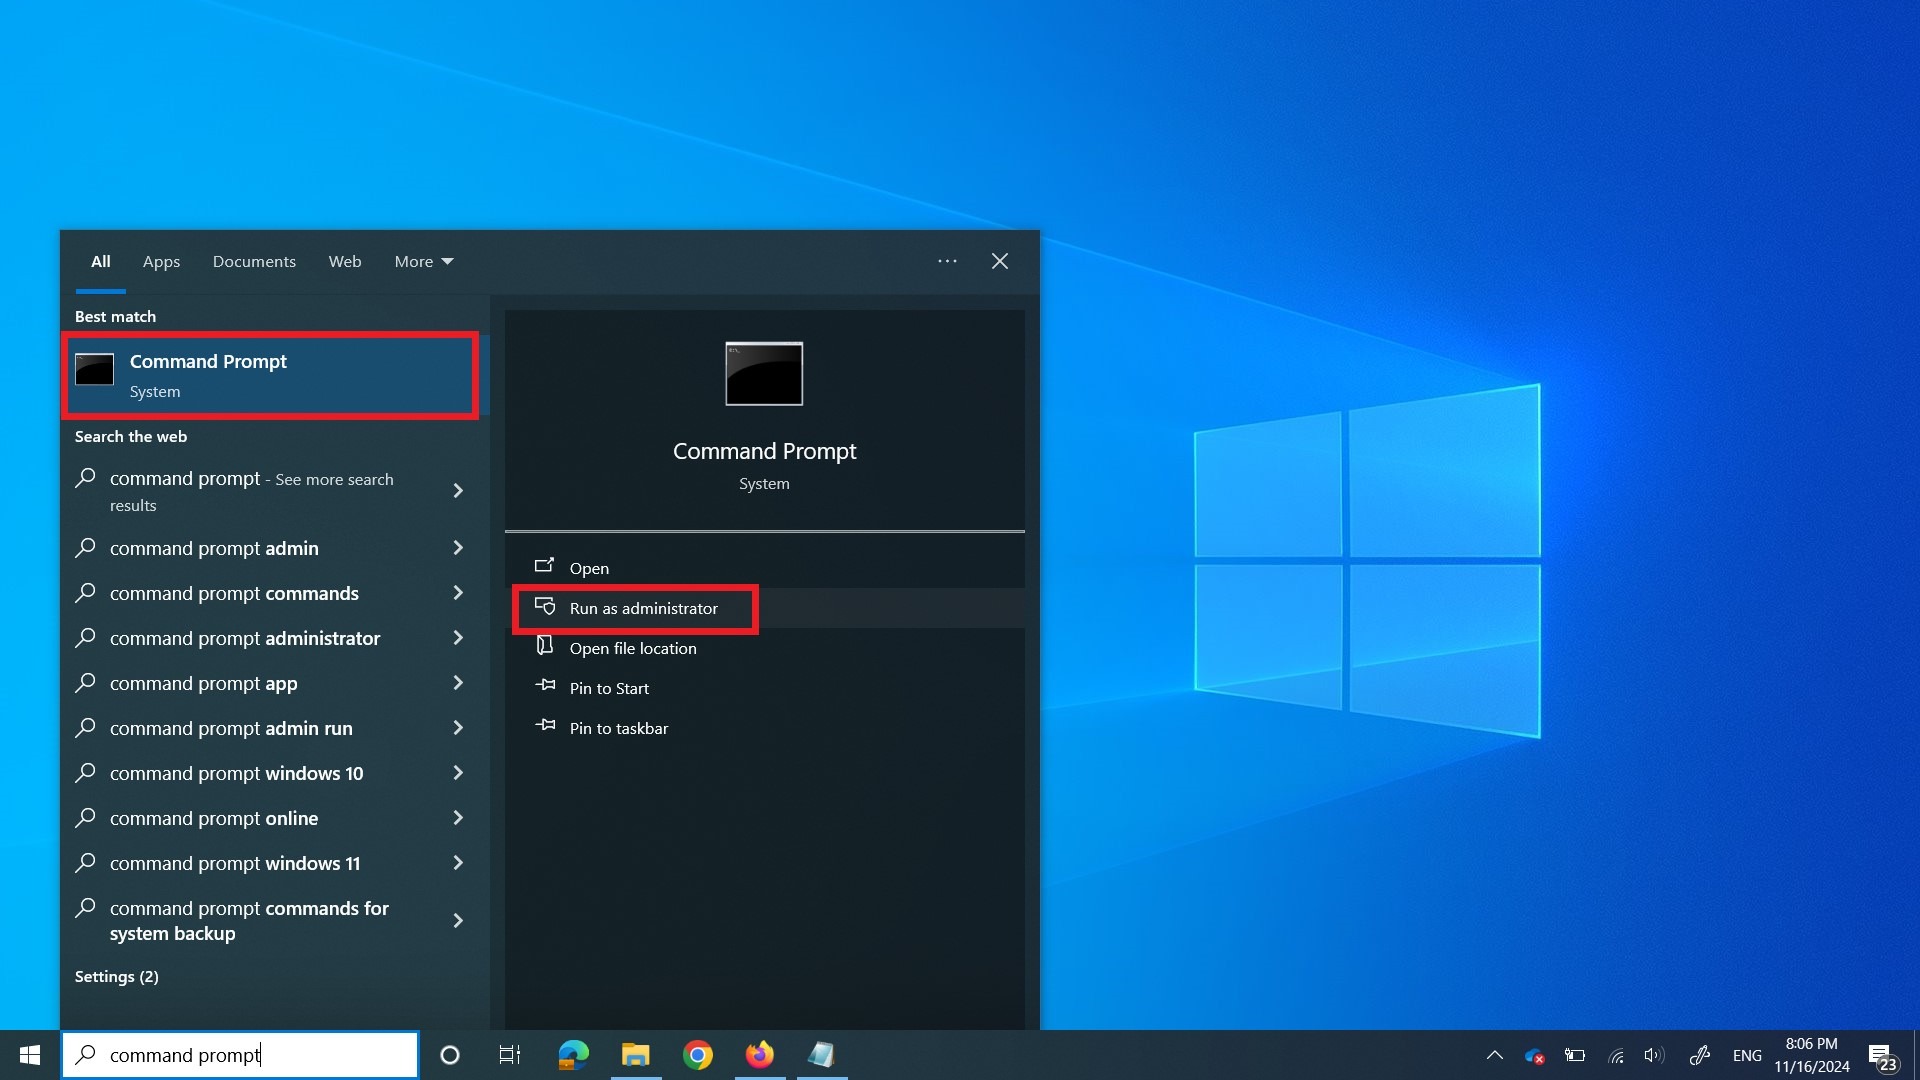
STEP 1 – Click on the window search bar, type [Command Prompt], select the [Command Prompt] and click on [Run As Administrator].
STEP 2 – Type the command(a) below inside Command Prompt and press [Enter]. If Prompt the password not meeting the password requirement, kindly follow the command(b) and press [Enter] again.
a) net user kmscan kmscan /expire:never /logonpasswordchg:no
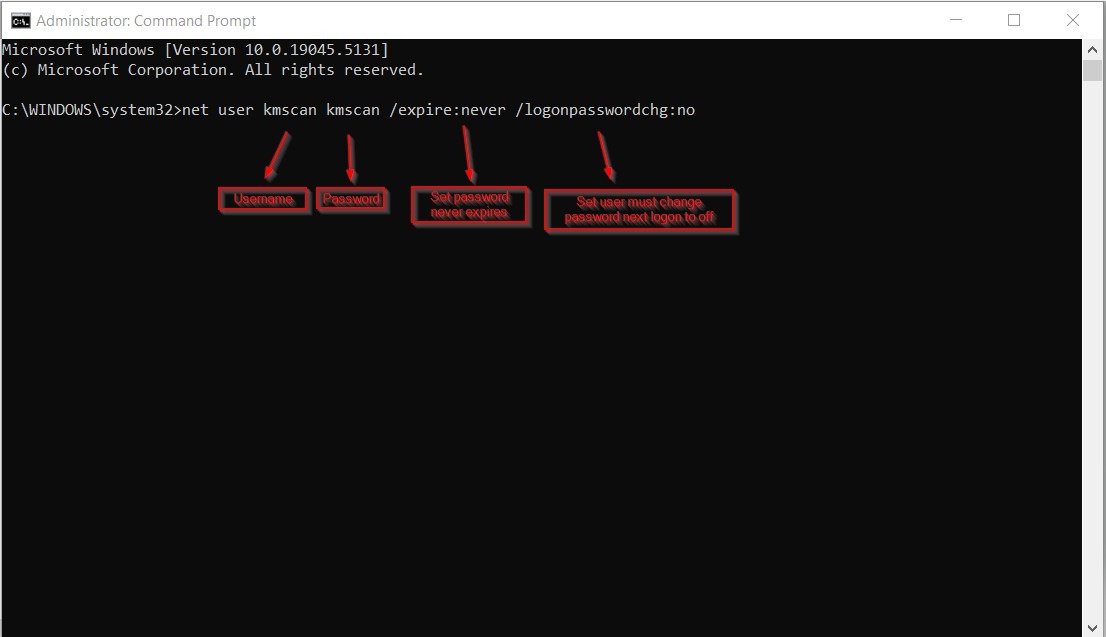
b) net user kmscan Minolta.123 /expire:never /logonpasswordchg:no

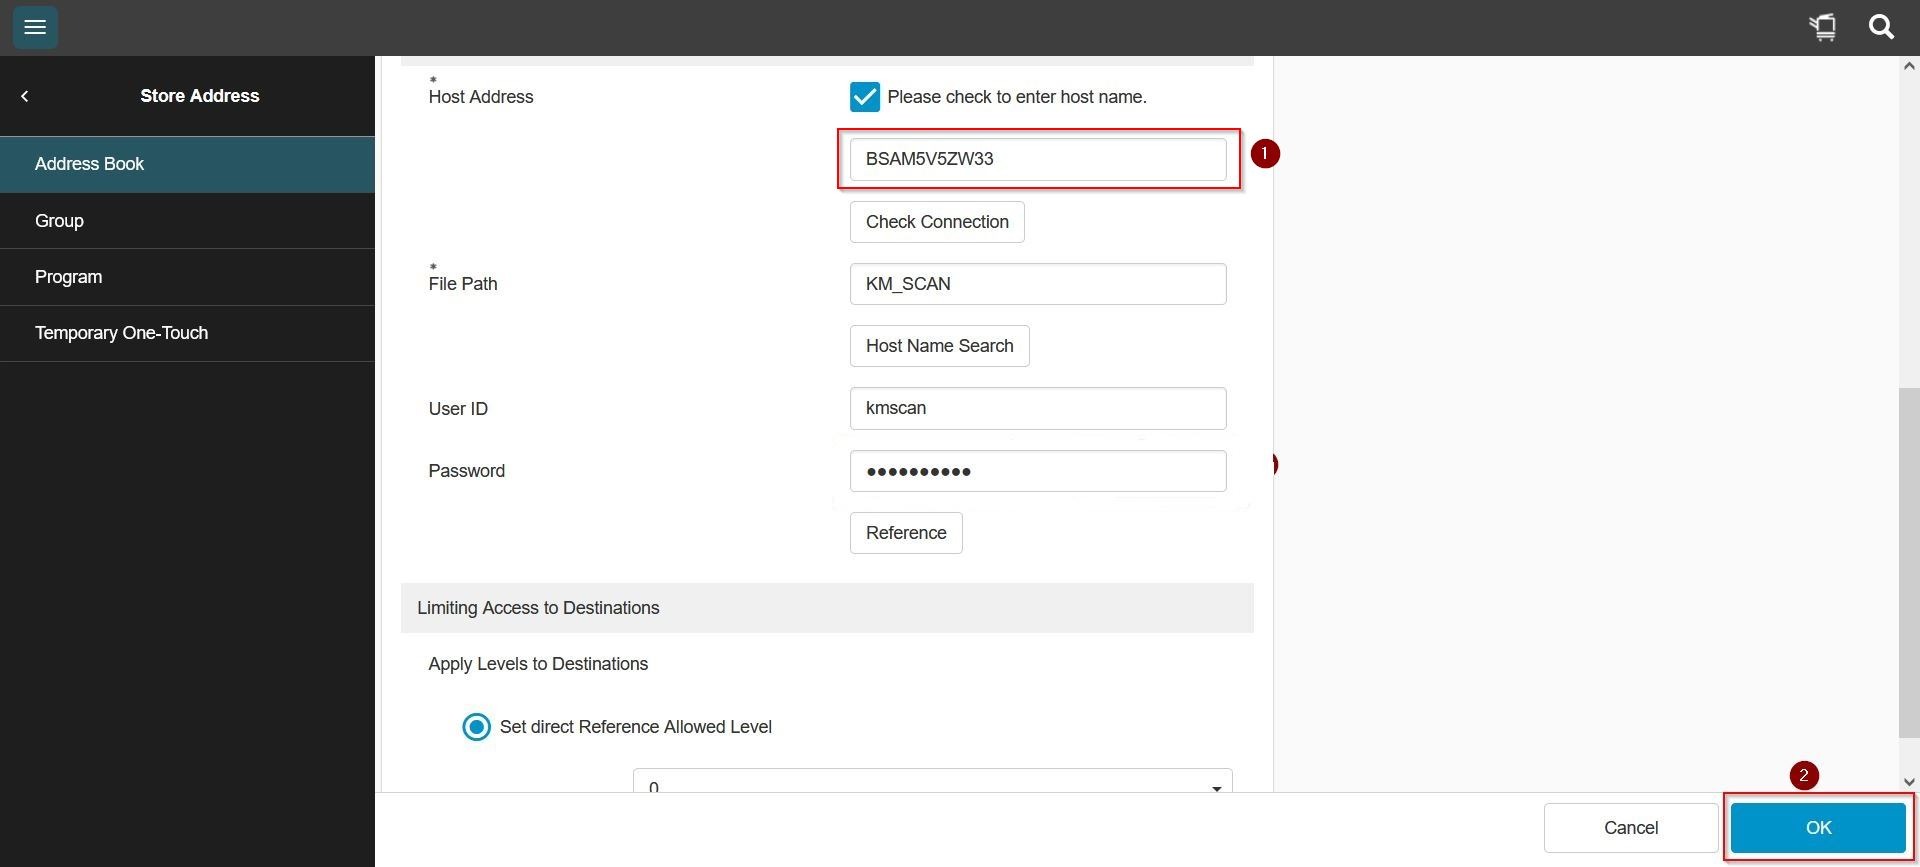
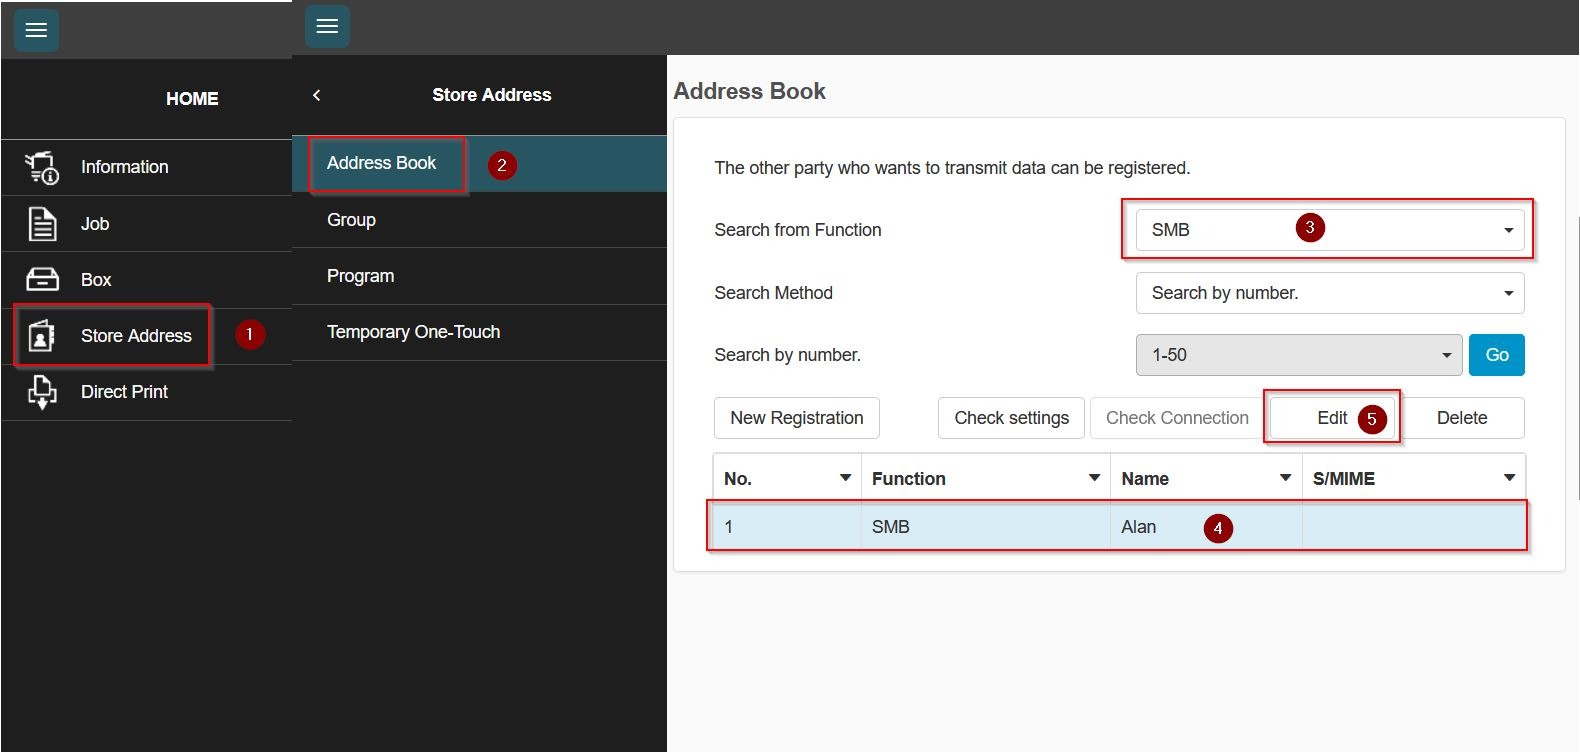
STEP 3 – Go to any web browser and type in Machine IP Address to access Web Connection. You may refer here on how to access Web Connection. Then proceed to [Store Address] – [Address Book].
For Non I Series Machine, select the name that unable to scan to particular PC, then click on [Edit].
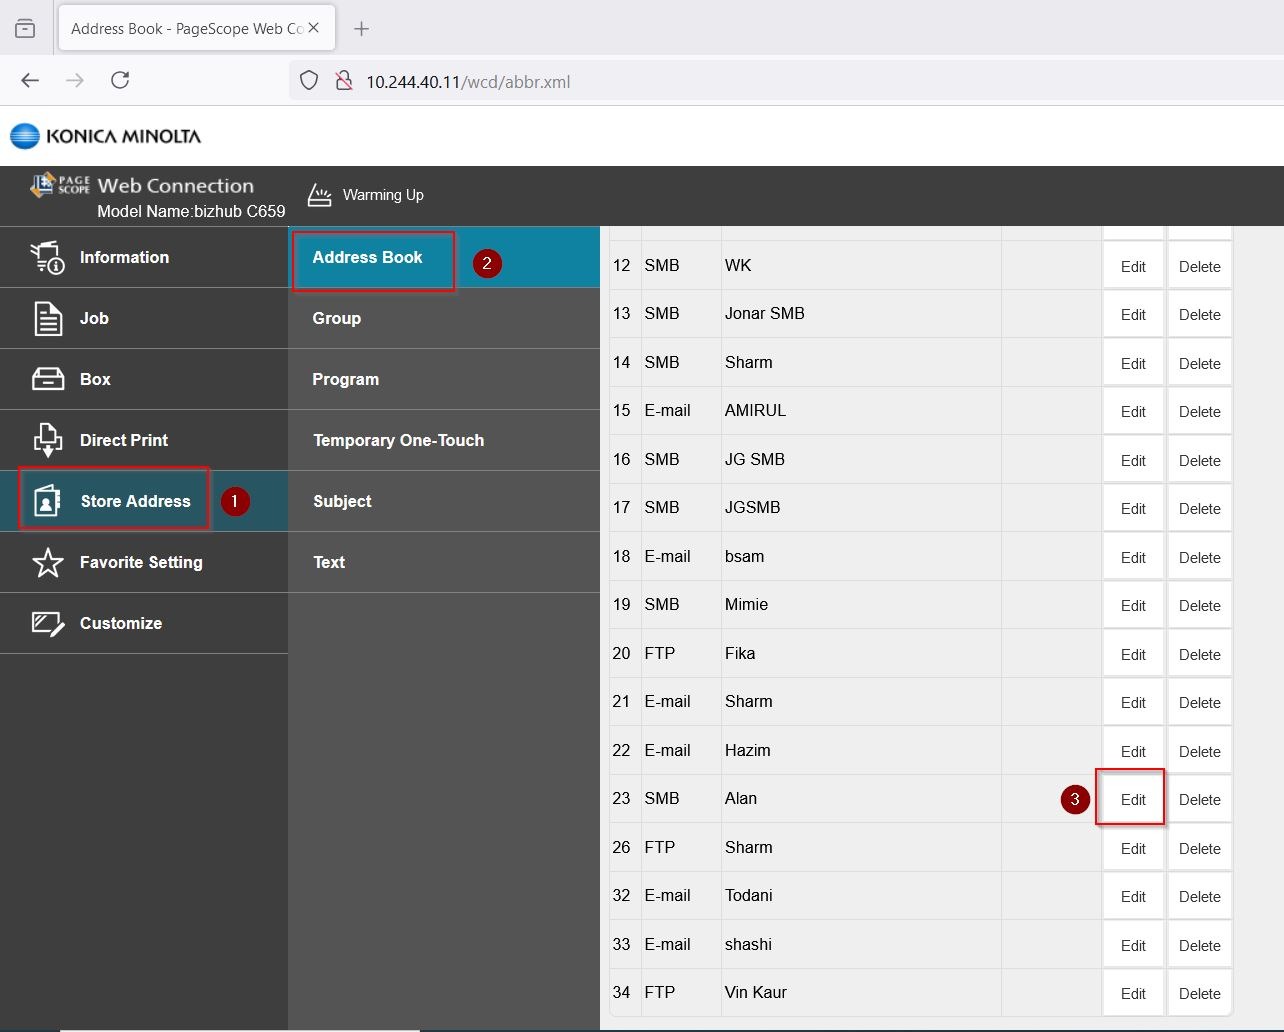
For I Series Machine, change the [Email] -> [SMB], highlight the name that can’t scan, then select [Edit] and proceed to next step.
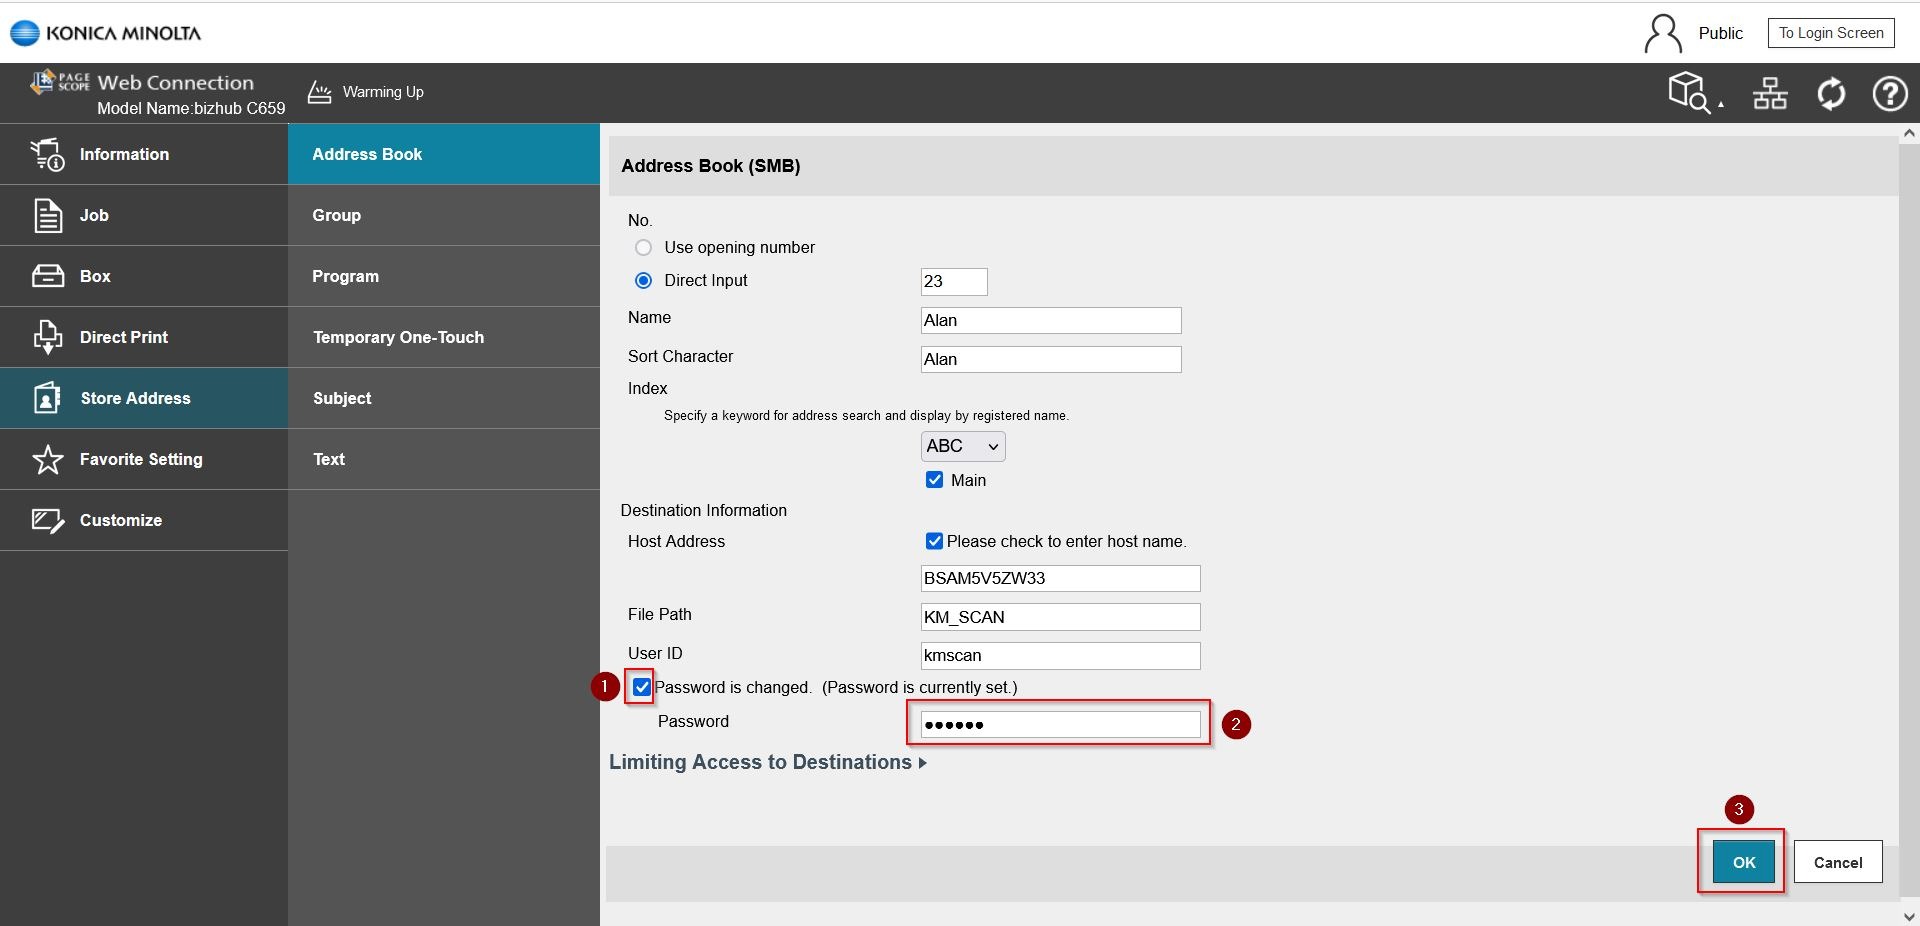
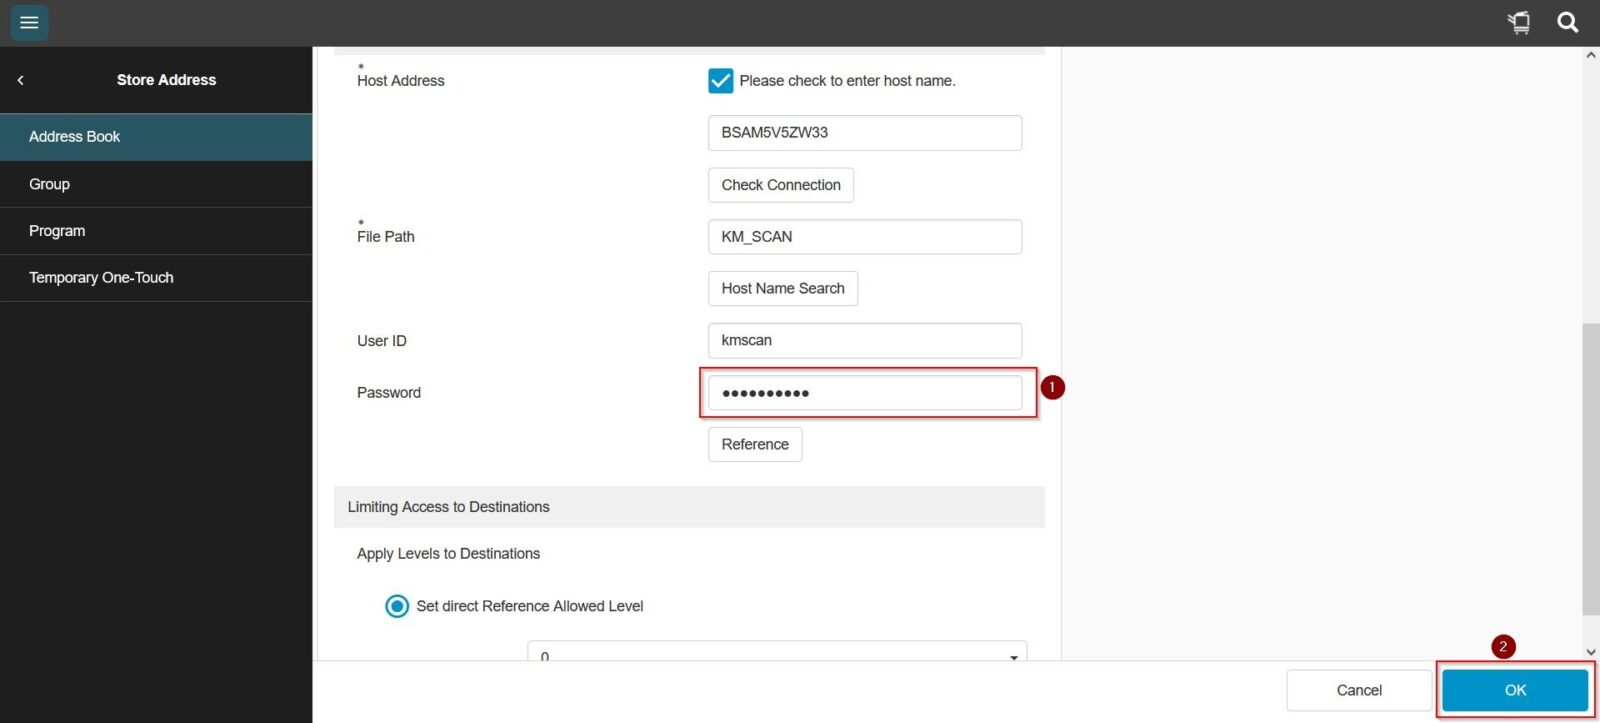
STEP 4 – Scroll down and tick password not expired, then proceed to type in the password that has been set on step 2, key in password kmscan if it is (a) and password Minolta.123 if it is (b). Click [OK] to save the setting.
For Non I Series Machine
For I Series Machine
2) Password Protected Sharing (Not applicable to the PC which is under domain) & Public Folder Sharing
Windows updates sometimes unexpectedly turn on password protected sharing and turn off the public folder sharing, which affect the scan to SMB, kindly follow below step on how to disable password protected sharing and public folder sharing.
On Windows 10
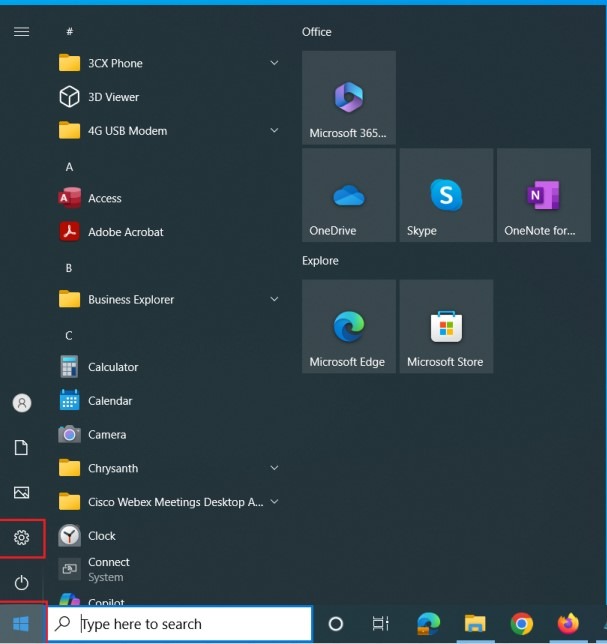
STEP 1 – Click on the windows [Start] button and select [Settings].
STEP 2 – Navigate to [Network & Internet] – [Ethernet] if connect via wired network or [Wi-Fi] if connect via wireless network – [Change advanced sharing options].

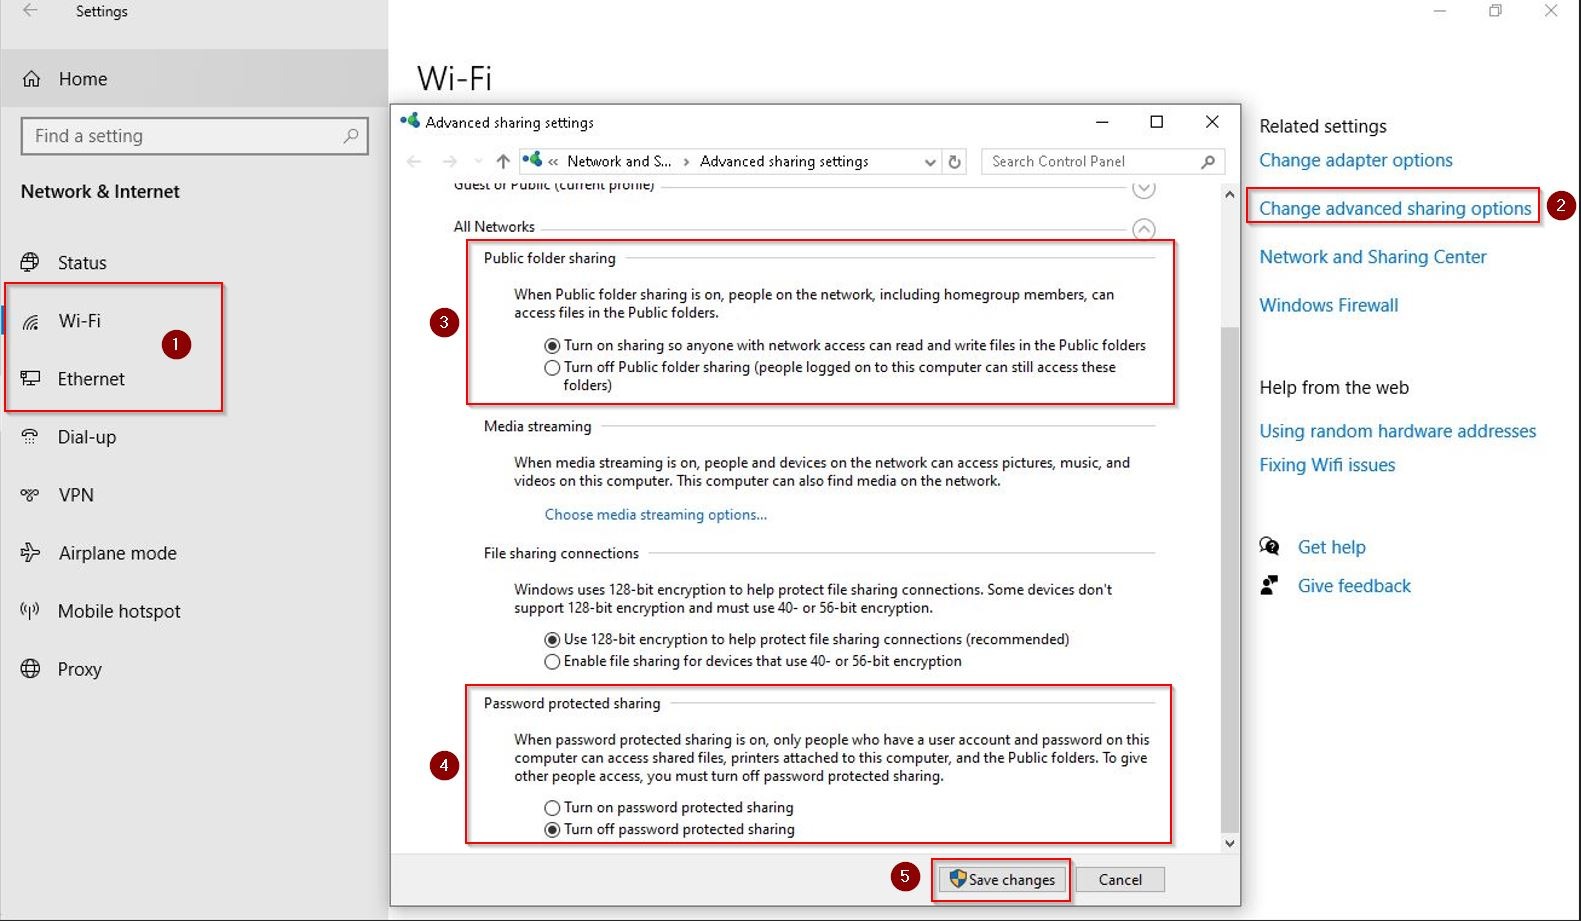
STEP 3 – Expand [All Networks], under Public Folder Sharing select [Turn on sharing so anyone with network access can read and write files in the public folders]. Under Password Protected Sharing select [Turn off password protected sharing] and click [Save changes] to save the settings.
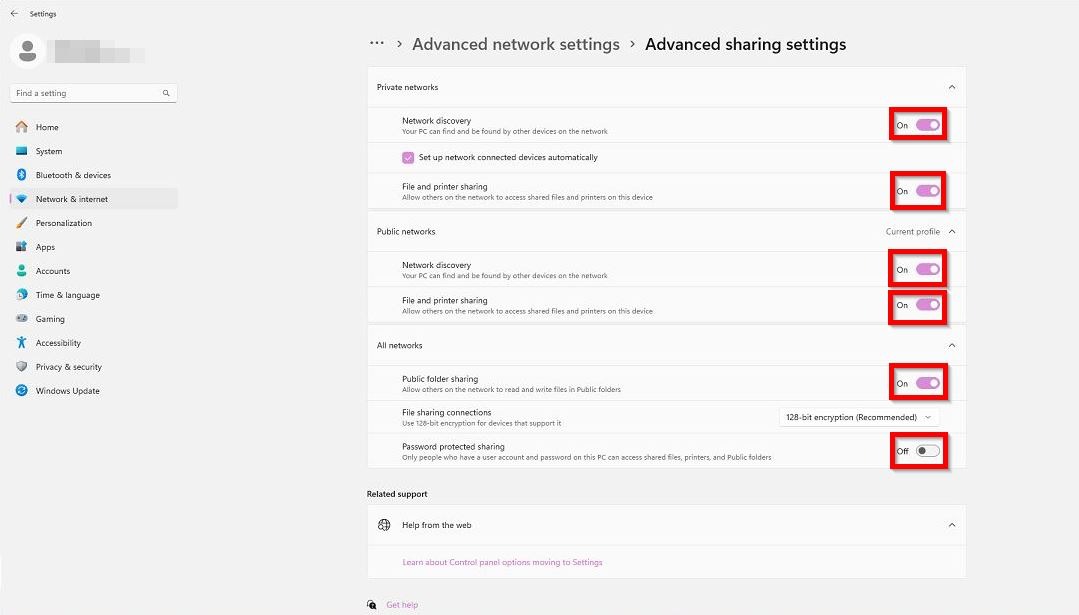
On Windows 11
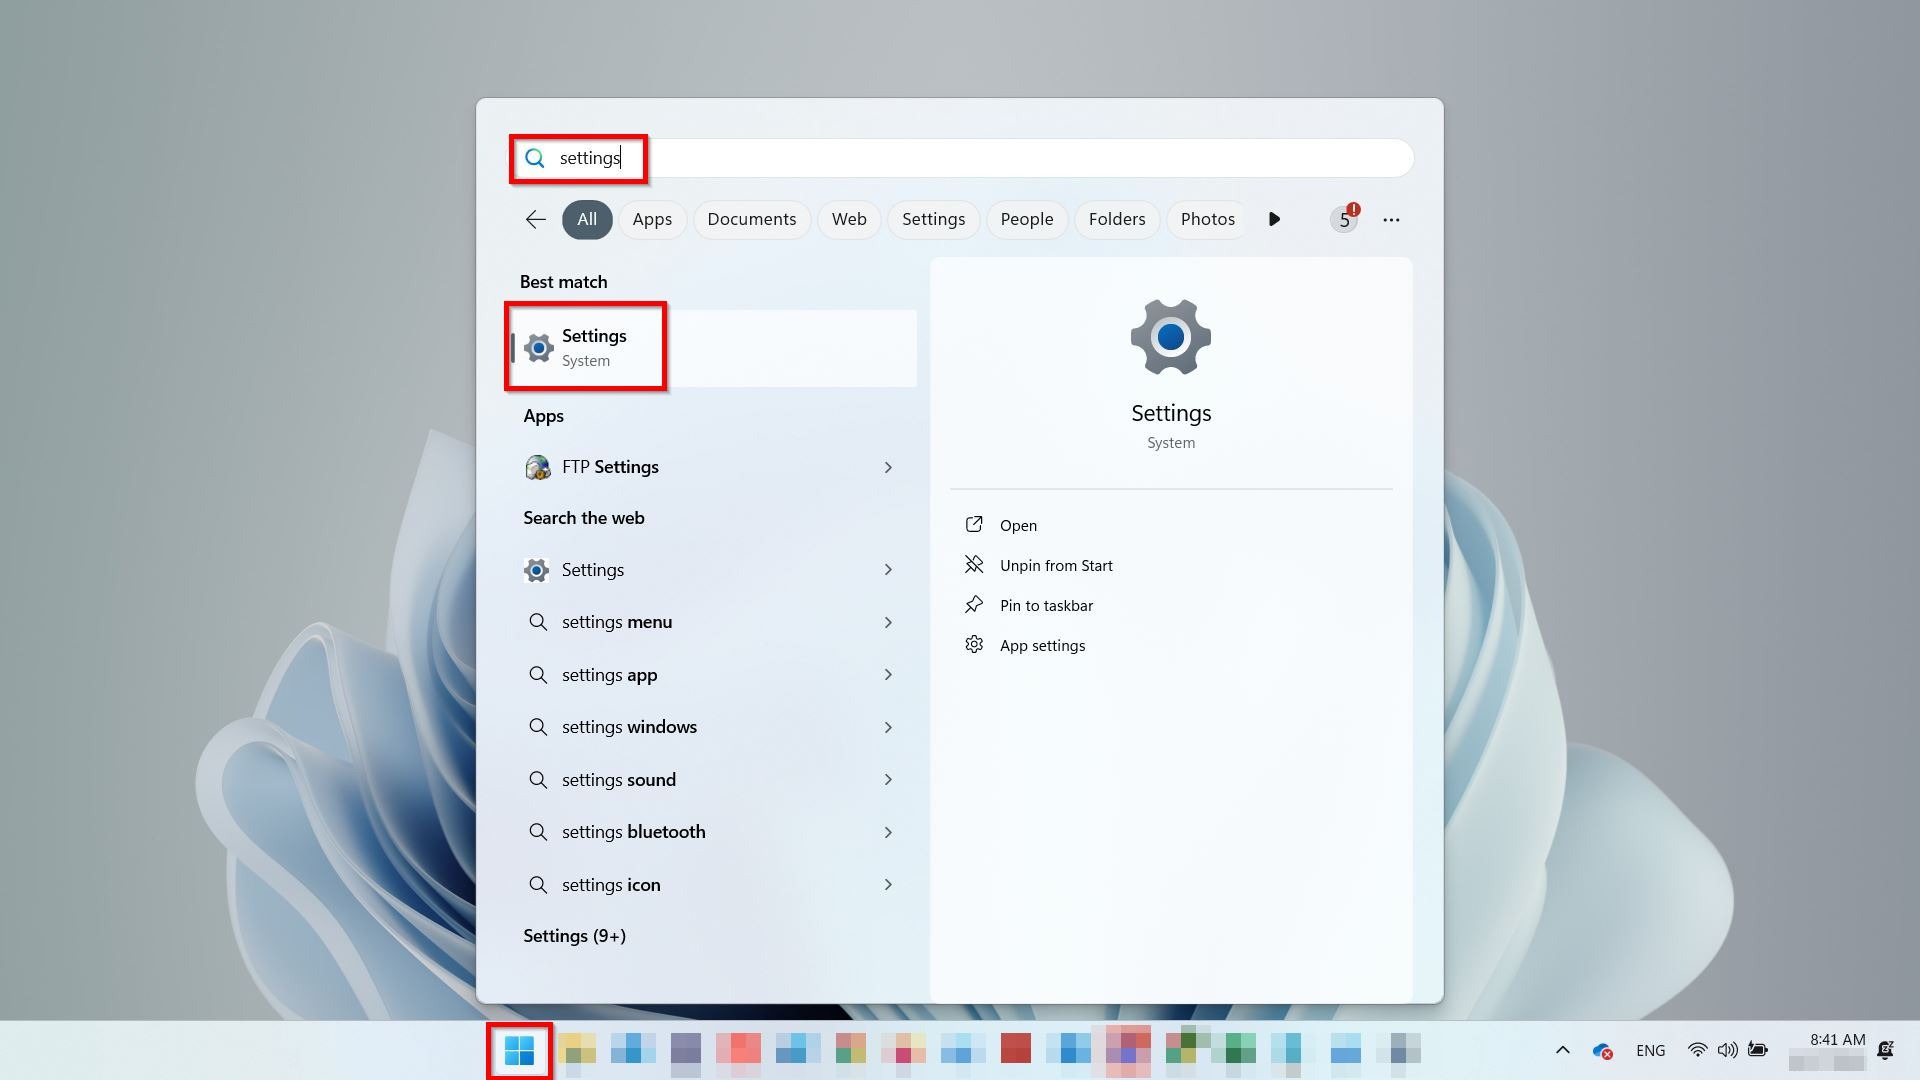
STEP 1 – Click on the windows [Start] button, type [settings] and select [Settings].
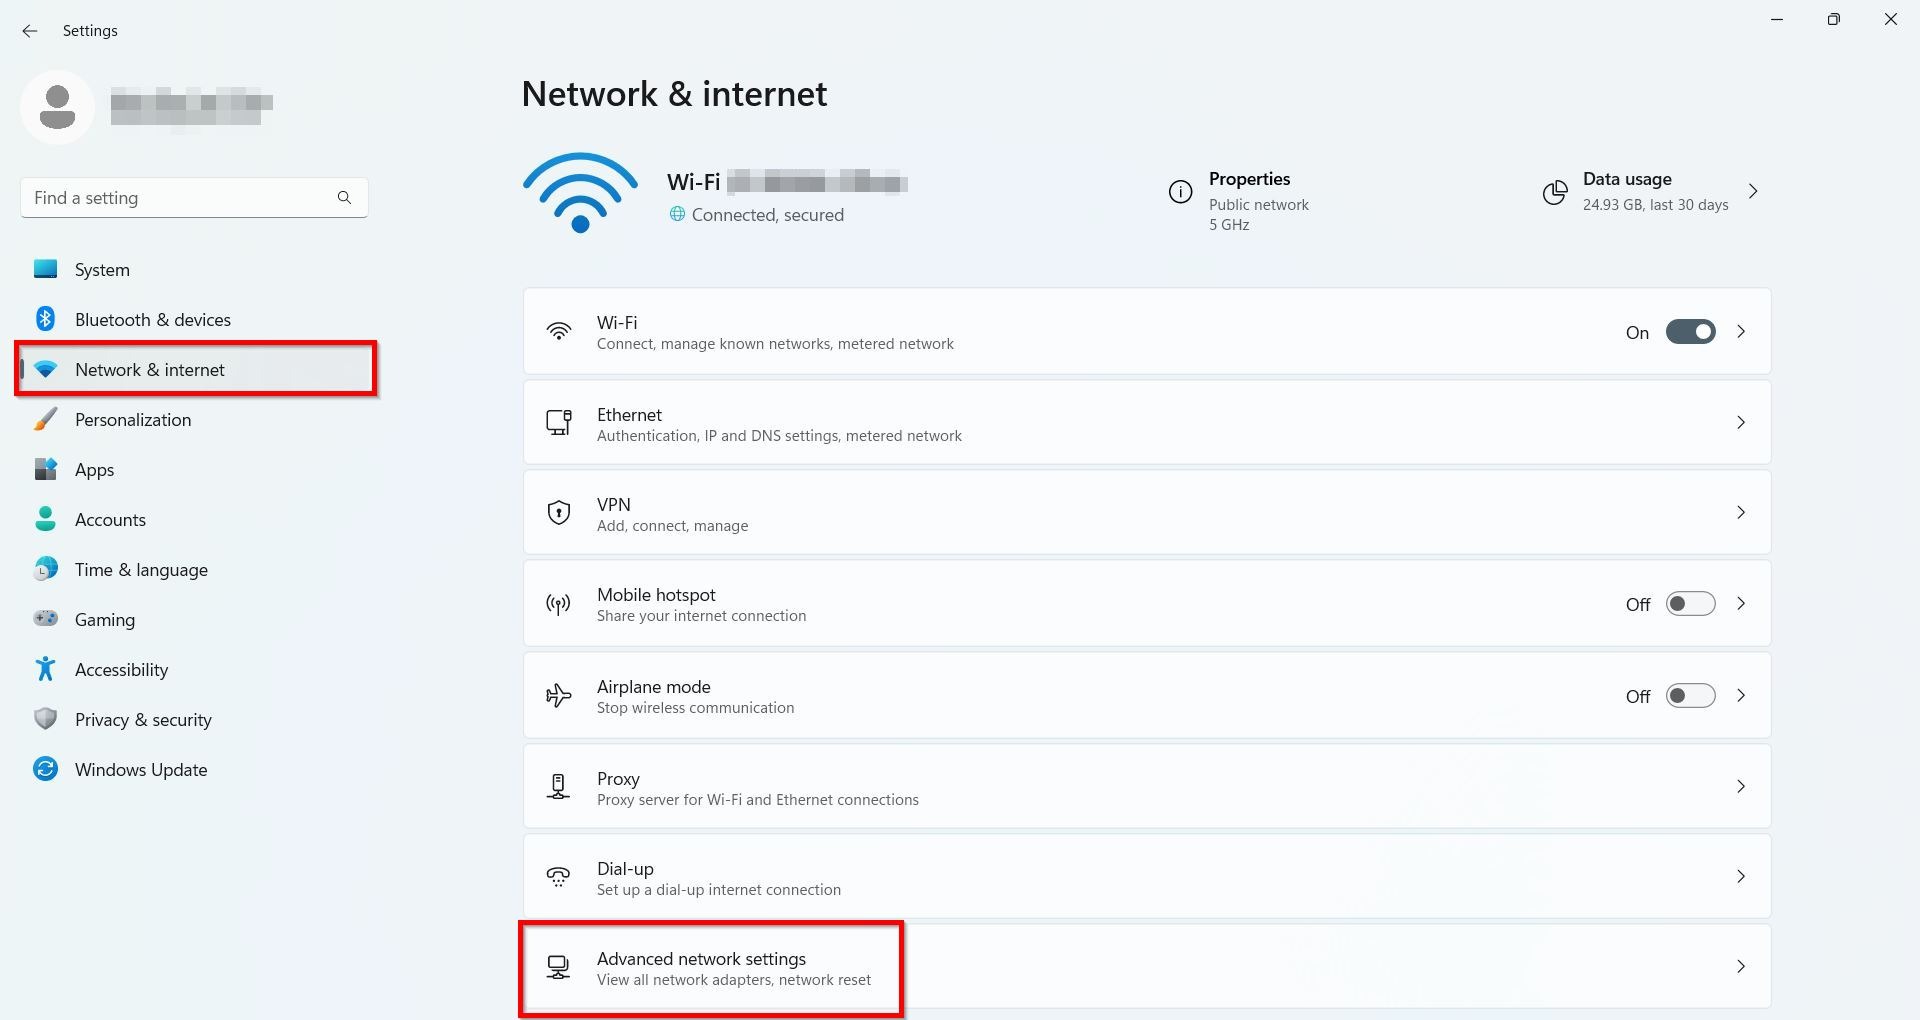
STEP 2 – Navigate to [Network & Internet] – [Advanced network settings].
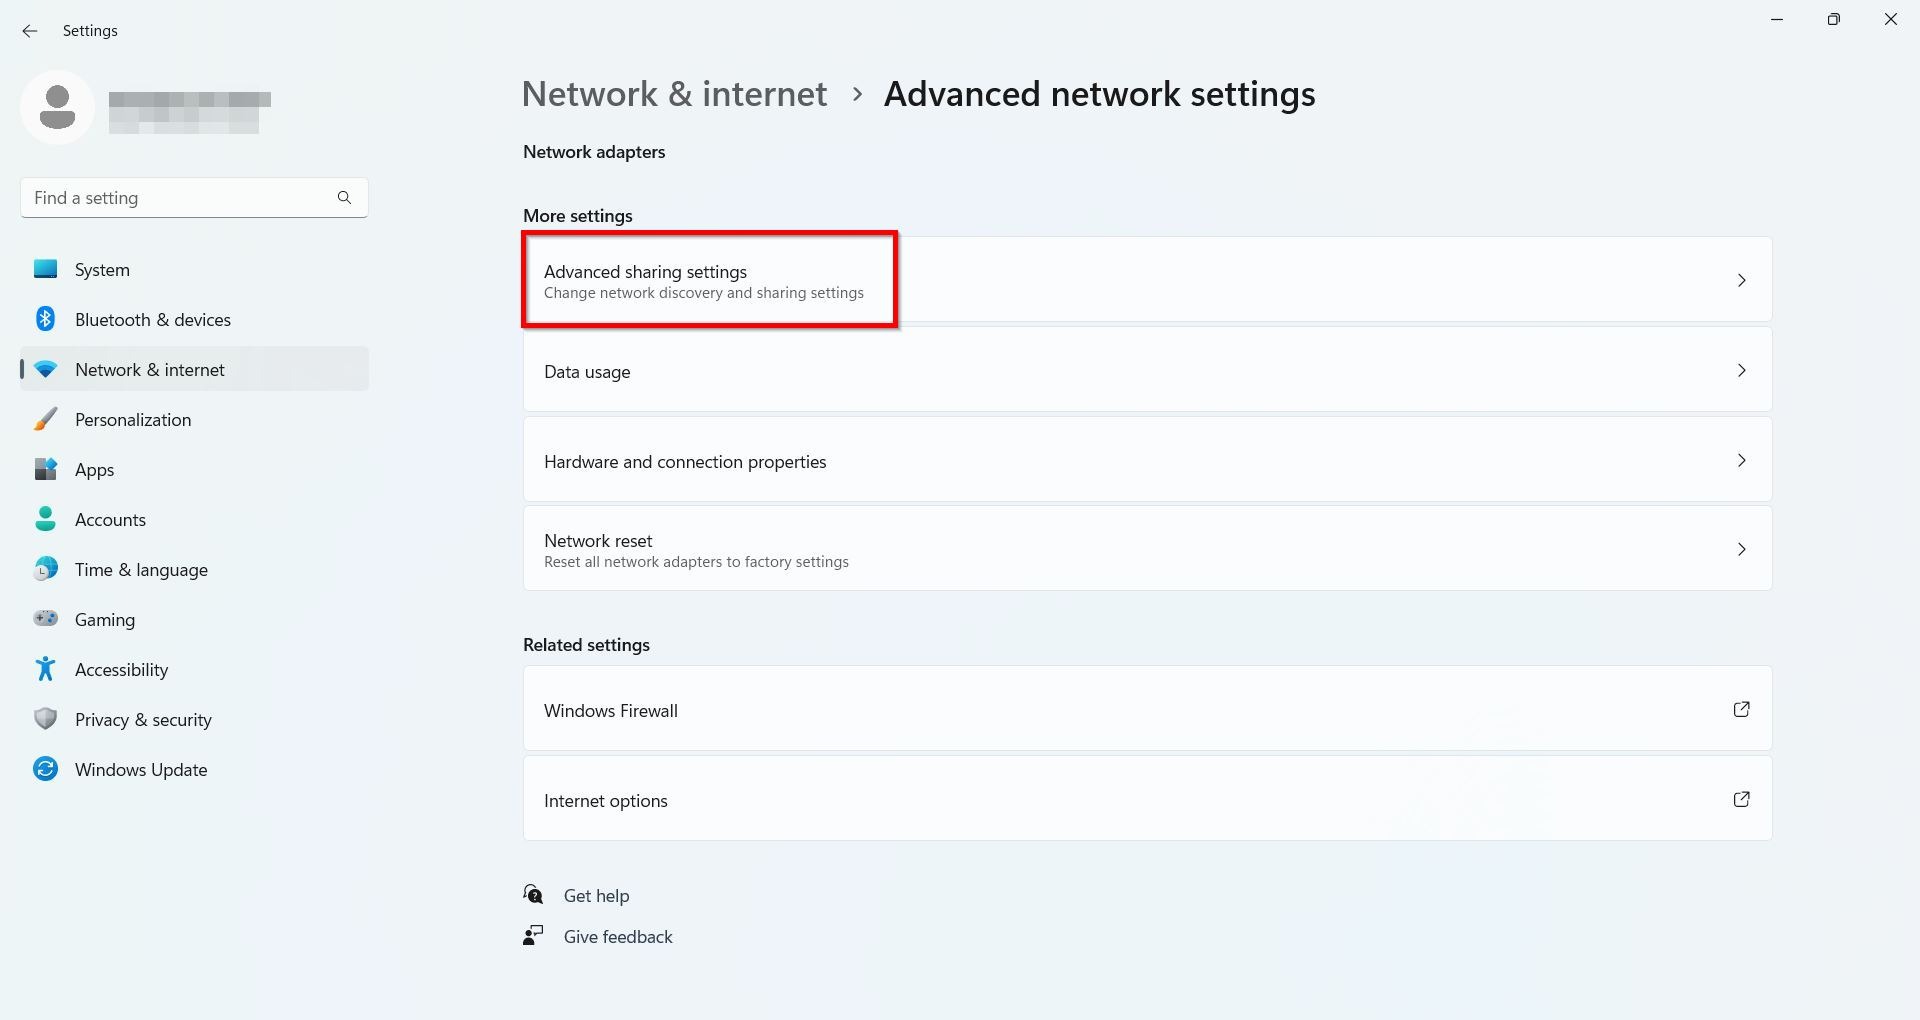
STEP 3 – Select [Advanced sharing settings].
STEP 4 – Expand [Private Networks], [Public Networks], [All Networks] ensure the following setting is [Turn On] and the password protected sharing is [Turn Off].
3) Sharing and permissions of the folder
If the issue persists, kindly check the share settings and permissions of the folder.
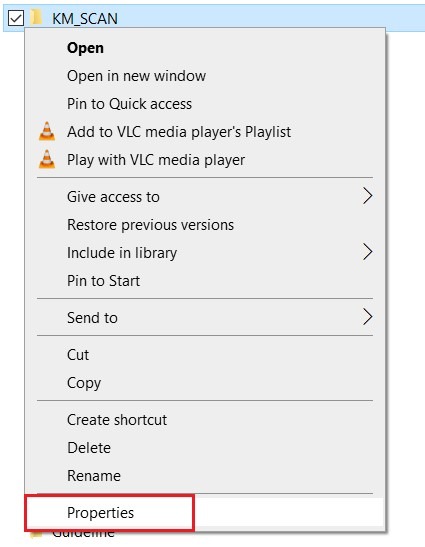
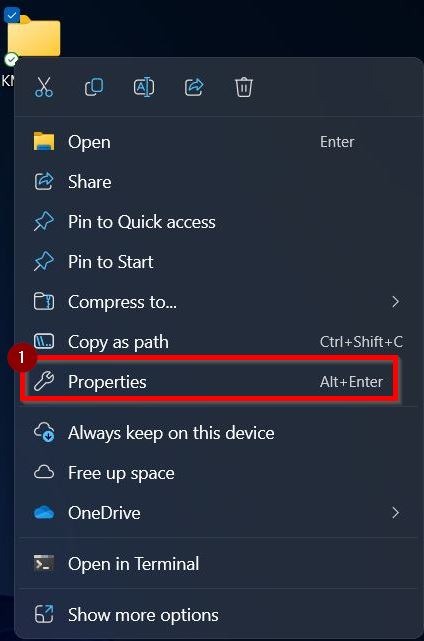
STEP 1 – Right click on the scan folder and select [Properties].
On Windows 10
On Windows 11
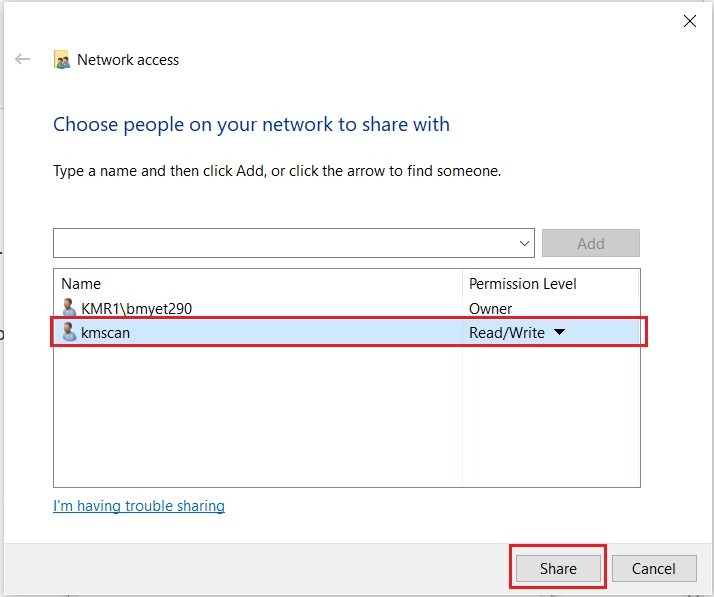
STEP 2 – On the folder properties dialog, navigate to [Sharing] tab and click on [Share] button.

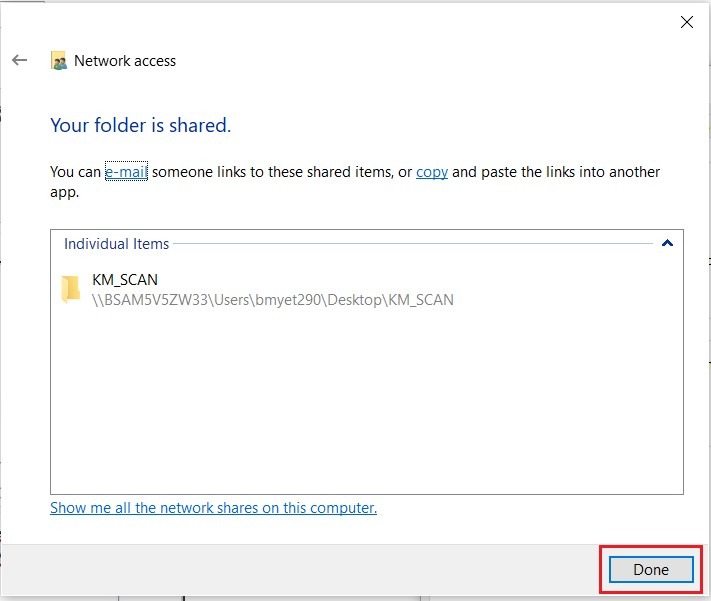
STEP 3 – Make sure the scan user account [kmscan] is added and the permission level selected [Read/Write] then proceed to click [share] – [done].
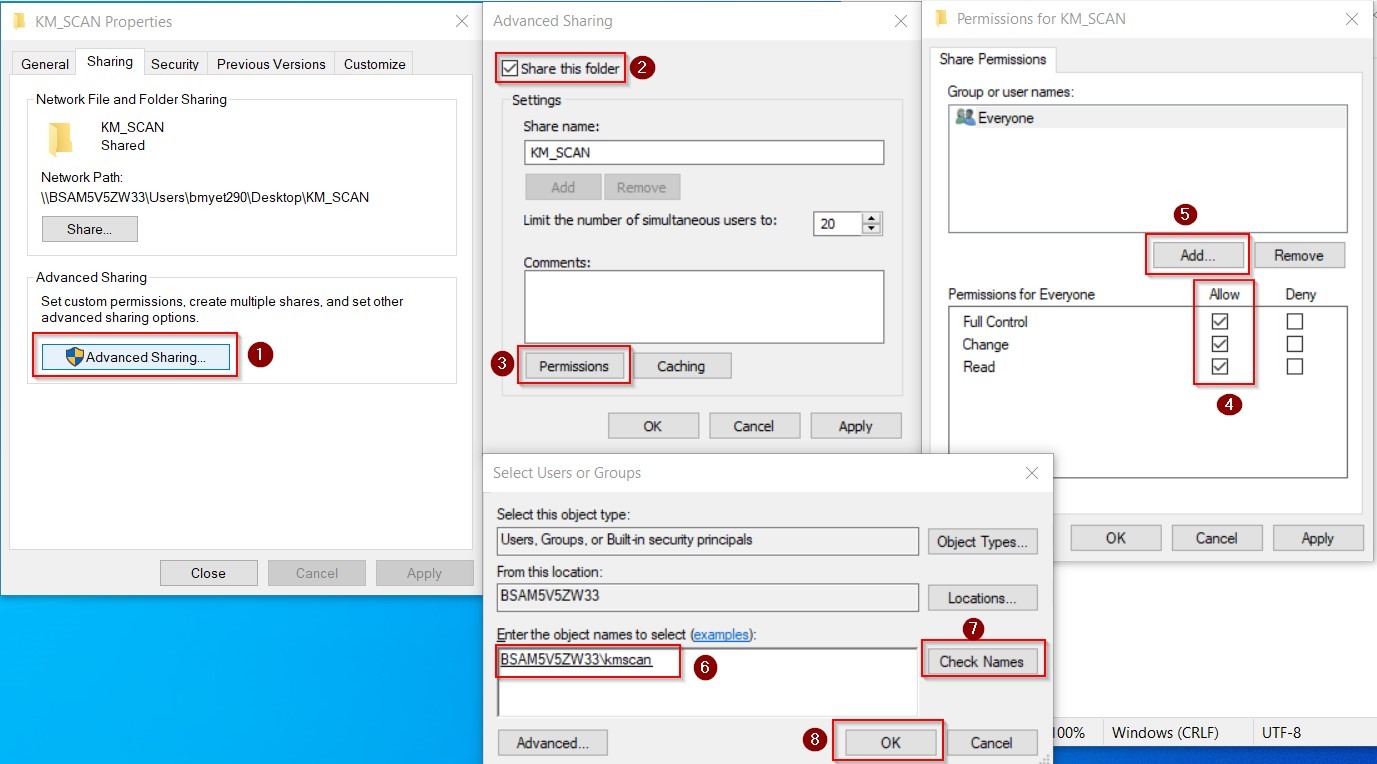
STEP 4 – Proceed to click on [Advanced Sharing]. Make sure to tick [Share this folder] and click on [Permissions].
STEP 5 – On the Permission dialog, click [Add] if you don’t see the scan user account [kmscan] in the list.
STEP 6 – On the [Select Users or Groups], type the scan user account kmscan and click [Check Names]. If it finds the user account, it will add your computer name followed by backslash to username. In this example will be BSAM5V5ZW33\kmscan.
STEP 7 – Click [OK] to add kmscan user account to the list.
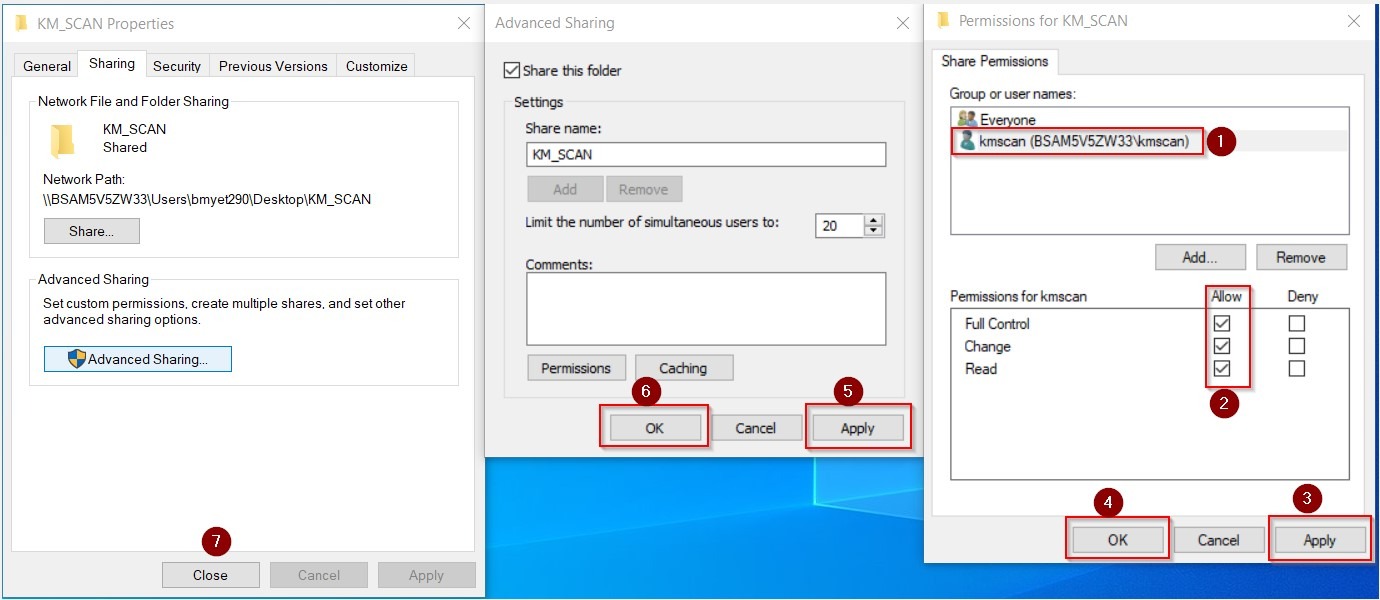
STEP 8 – Highlight the kmscan user account and set permission to [Full Control]. Click [Apply] – [OK] twice to save the settings.
4) Changing of the computer name
Beside the above issue, it might be the issue that the computer name has been change or updated, as scan to SMB normally is using computer name to scan, kindly check the computer name via Command Prompt.
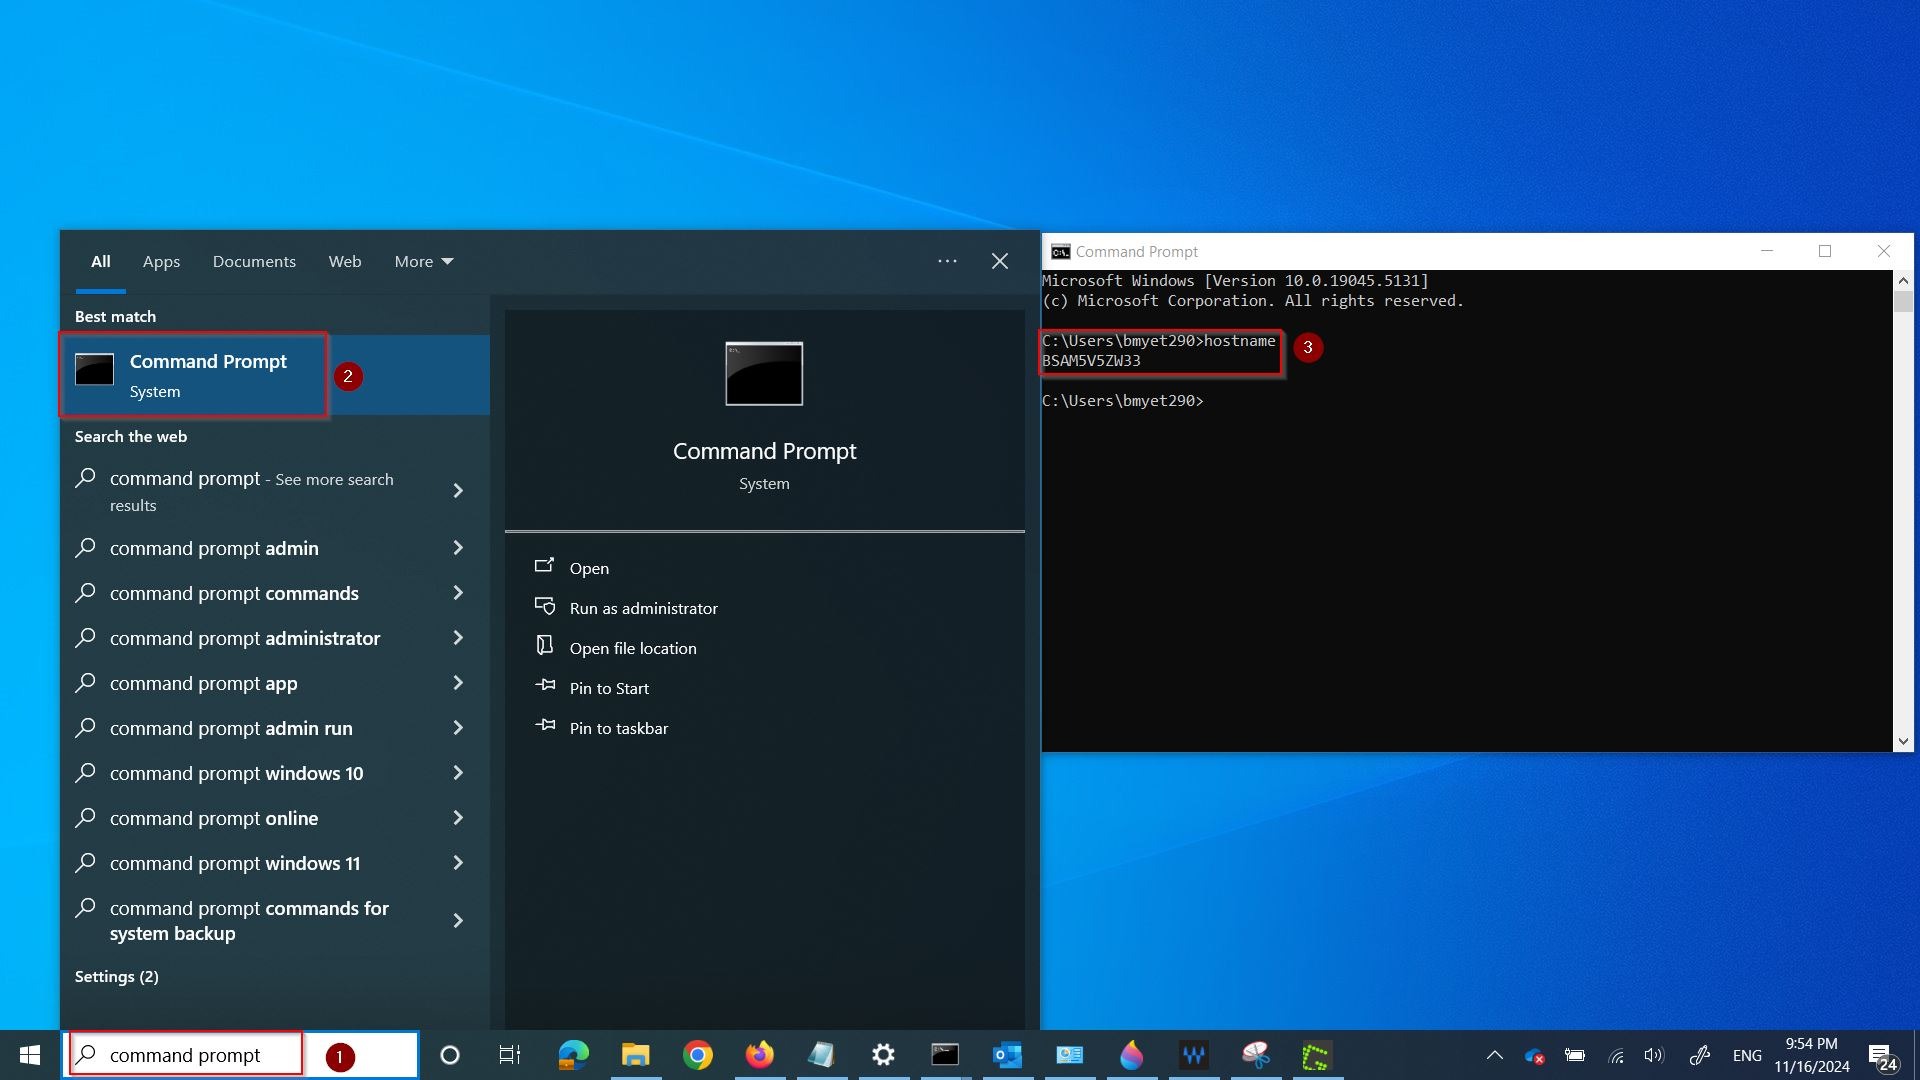
STEP 1 – Click on the window search bar, type [Command Prompt], select the [Command Prompt].
STEP 2 – Type the command hostname inside Command Prompt and press [Enter]. It will show the computer name, kindly take note on this and will need to be use later on next step.
STEP 3 – Go to any of the browser and type in Machine IP Address to access Web Connection. You may refer here on how to access Web Connection. Then proceed to [Store Address] – [Address Book].
For Non I Series Machine, select the name that unable to scan to particular PC, then click on [Edit].

For I Series Machine, change the [Email] -> [SMB], highlight the name that can’t scan, then select [Edit] and proceed to next step.
STEP 4 – Scroll down and check under host name whether is it the same as we get on Command Prompt on [Step 2], kindly replace it with the correct computer name on host name if incorrect then click [OK] to save the setting.
For Non I Series Machine
For I Series Machine